salsa-king
Members
-
Joined
-
Last visited
Everything posted by salsa-king
-
Has performance creations got any for your car?
-
not had my camera out for over a month, so feel I'm getting back into things now my car is all clean-ish for the party at the weekend. 10th anniversary of Midland Scoobies, they having a track day at Curbrough (sp) pix edited in LR and logo/boarders added in PS. Garage Racers-25a by salsa-king, on Flickr Garage Racers-14a by salsa-king, on Flickr Garage Racers-23a by salsa-king, on Flickr
-
I found i-mode laboured the car more and used more fuel, try it in Sport mode, it's not mental and you'll see better mpg on longer journeys. I use i-mode in snow, Sport# when I need to have better acceleration etc.
-
Waste gate chatter. Speak with Scooby clinic see what you need. Just dont rev your car like that!
-
Waste gate chatter. Speak with Scooby clinic see what you need. Just dont rev your car like that!
-
Gotta be done
-
all fitted in place Garage Racers-2a by salsa-king, on Flickr
-
Garage Racers-2a by salsa-king, on Flickr
-
Welcome Speak with Ian at performance creations about mud flaps
-
6. Locate the centre horn, use WD40 to help it come off, unclip the cable from it and remove the bolt and horn. The bolt isn't needed so don't replace it. 7. Look for the 2nd horn on the drivers side. Unclip the power to it (I insulating taped it up to protect from weather and taped it up out the way. Remove this horn + it's holding bracket (if you like), I did and put the bolt back in. Just in case I wanted to fit the old one back I'd know where it went. 8. Once you have your Horns fitted onto your bracket (with the notch cut out on the left - as you look at it) you can fix it to the centre (remove centre bolt like in my picture) using the bolt you've taken out. 9. The relay I took all the way to the left side of the front protection bar, tie clipping it to the bar and an extra tie clip to a bracket hole you will see when you're doing it. 10. Once all that is in place you can feed the rest of the wiring loom along the same protect front bar (there is a slight channel you can keep the loom running in as you tie clip it securely along it. Also neatly tie clip the loom wires that come from the back of the horns down the centre, as shown below. 11. Then take the last bit of the loom that needs to go to the + & - of the battery, up behind the head light and on the inside of the wing. When you're doing it you'll see where's best for you to feed it along, connect Red to Power + and Black to negative on the battery (test of course before you fit it all neatly). 12. Tidy up any of your tie clips, check all is secure and clean all the muck off bits you don't normally get to ;) 13. You can see the difference the Hella's are compared to the standard horn! 14. Now all to do is re fit bumper back on. 15. Now go and test your horns on someone... they are loud!
-
I bought my Hella Tones from Subimods, along with the custom fitting bracket and wire harness that they do. http://www.subimods.com/hella-supertone-horn-kit.html They do a fitting PDF how to, but there's nothing better than an a write up by me showing that the ordinary man in the street can do it too. Here goes... 1: Undo the clips holding the front bumper on. 4 on the wheel arch. 4 across the front grille and 6 on the under side of the bumper. 2. I put a couple of screw drivers in two of the grille holes, so when you take the bumper off it doesn't fall off in one go. 3. Ease the sides of the bumper away from the wings. Not much pressure needed, they came out dead easy. 4. Pull out with your fingers the washer jet covers and unclip the cover off the washer. Easier than you think, they pull out quite a way so you will see what needs to come off. 5. Bring the bumper away from the car and un clip any wire to the fog lights. Again, easy to do they pull off.
-
c130 Nilfisk?
-
it comes with 18s and 17s... are they both on the car tho. the s204 alloys, would cost a lot to get them to make a specD into a s204 rep
-
two different alloys on it though, left side to the right side
-
Devil Snow Foam is pre mixed and just connect to hose pipe?? If you have a jet was , you need the proper sf lance, then put 150ml in the litre bottle and top up with water. then you get this...
-
watch it doesn't break the fins of the turbo and drop in the engine? Is it a Focus by any chance?
-
I've tried loads... it all the same stuff just in different containers. Just buy this and be over the moon you've found it now and not later http://www.ebay.co.uk/itm/UK-VALET-CHERRY-SNOW-FOAM-BULK-25L-DRUM-TRADE-/121317063891?pt=UK_Car_Accessories_Car_Care_Cleaning&hash=item1c3f0f7cd3
-
Just setting up these to fit this weekend ;) a friend is coming over to help with bumper removal :ouch:
-
cheers, 2nd coat of wax went on tonight. marks on the spoiler bug me, but without going mad with a polisher.. which I'd end up polishing all the paint off, they'll have to stay there lol...................... rest of the car looks ok though ;)
-
applied a 2nd coat of wax to the car tonight
-
is your car remapped for the mods?
-
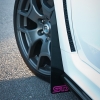
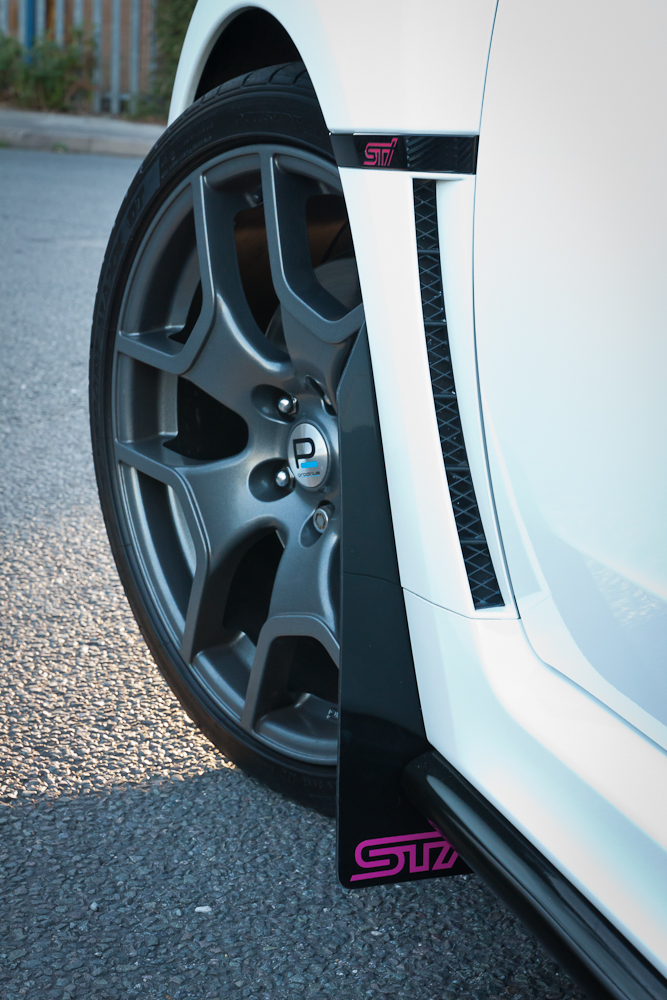
fitted mud phlaps
-
£65 but these are the new ones, don't think listed on the site yet. http://www.ebay.co.uk/itm/Rally-Mudflaps-to-fit-SUBARU-IMPREZA-Hatchback-08-Saloon-Mud-Flaps-Black-x-4-/150921264824?pt=UK_CarsParts_Vehicles_CarParts_SM&fits=Car+Make%3ASubaru%7CCars+Year%3A2008&hash=item23239bbeb8 best speak with Ian, if you want the new design. :)
-
eeeer no! how close do you park to the kerb?? I have a plank to step across from car to the pavement when I park. get some flaps Pete, it finishes the car off!! ;)
-
For those who've not seen them yet, I've now got the NEW GENERATION II Performance Creation Mud Flaps for the Hatch, they arrived on Friday from Ian. So this afternoon I re fitted the new style. I had to whip off the old ones (again from Performance Creations) easy to do when you know how, and re fit the newly designed style. Better design on the front flat to the originals I had (left pic). The new ones are 4mm thick compared to the 3mm the 'old' ones were. Also you can slightly move in or out the front flaps depending what look you want. Really pleased they have less material on the fronts as I did find my gravel drive liked to hide itself behind the excess flap ;) They fitted a treat in the same fixing holes I made when I fitted the Generation 1's last year. Rears were a simple unclip and un do one support bolt. Nice new Nut/Bolt fittings were sent from Ian too, I did use the black bracket supports from the flaps I took off, as I only fitted new ones of those last week :doh: The fronts were a case of just removing the old push in clip studs. (new ones are supplied) Having the option of adjustment is good too, I put mine more out than in ;) You can see how there is more clearance and not a pocket to hide thing in and in place.... Once again really pleased with Ian @ performance creations customer service, nothing is too much trouble. When I get chance I'll get some better pix of them on the car in the open air.